Create a Sitemap for your Website, and Submit it to Search Engines
Maybe you’ve heard of a sitemap before, maybe you haven’t. Put simply, a sitemap is a “map” of your website for search engines like Google and Bing to index (or catalog, order, take note of). More specifically speaking, it’s a list of all your pages on your website, and its purpose is to tell search engines that you have these valuable pages for potential website visitors to see. Because if search engines don’t know your website exists (for example, if it’s fairly new), it won’t know to tell the average ‘web searching Joe’ about it.
So you have a website, it’s been optimized for SEO (search engine optimization), you’re linking to the site from outside sources like Facebook, Twitter, other websites, etc., but you’re just not seeing any momentum on your page ranking. Well, you missed a step.
One of the first things you should do when your website is finished is to create a sitemap for it.
Yes, this is foreign and it sounds scary. But it’s actually quite simple!
- First things first, get yo’self a Google account if you don’t already have one. You can do that right here. I feel obligated to tell you to use Google Analytics on your website next, but that step – while extremely important and valuable – isn’t really necessary to creating a sitemap.
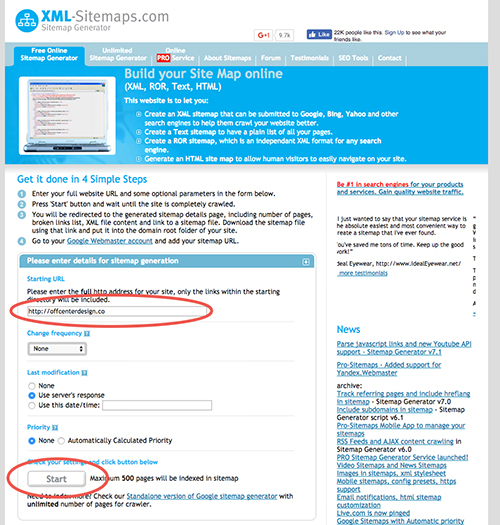
- Next, create the sitemap. If you’re a savvy coder, I’m sure you can DIY this part, but if not, there are several online resources to help you create this XML file. Here’s one I recommend: XML Sitemaps. Simply enter your website domain (www.yourwebsitename.com) into the “Starting URL” box near the top of the page, and hit “Start.” Don’t worry too much about the additional options below entering your URL. It may take a minute or two depending on how large your website is.
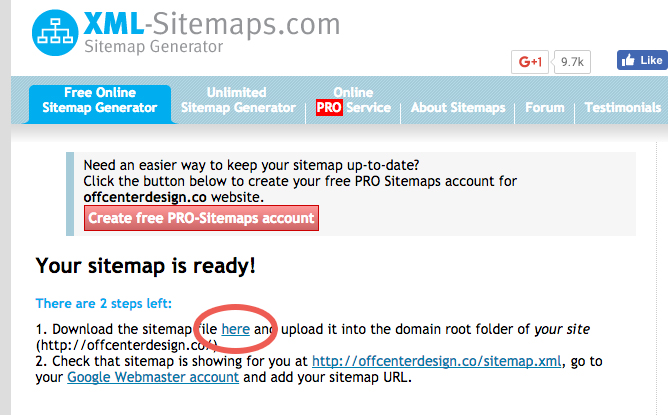
- Download the XML file, and save it somewhere special. (I say special, because it really doesn’t matter where you save it. Just remember where you put it, because we’re going to access it soon.)
- Login to your FTP account through FileZilla or Cyberduck. If you’re not sure what this means, contact your hosting provider (e.g. GoDaddy, Bluehost, Hostgator, Namecheap, etc.). They should be able to provide you with your login credentials as well as some simple instructions for getting into your FTP account. Note: If you don’t have an FTP program like FileZilla or Cyberduck installed on your computer already, you’ll need to do this.
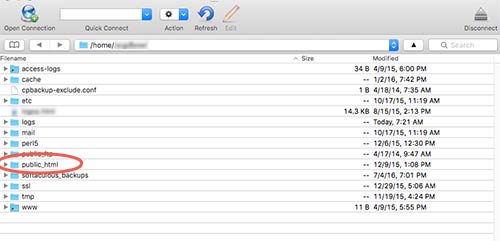
- Upload your newly created XML Sitemap file to the root folder of your website. The root folder is typically named ‘public_html’. To double-check, this may also be a good question to ask your hosting provider if you’re unsure. Oftentimes, when you log in to your FTP client, you’ll be directed to this folder automatically.
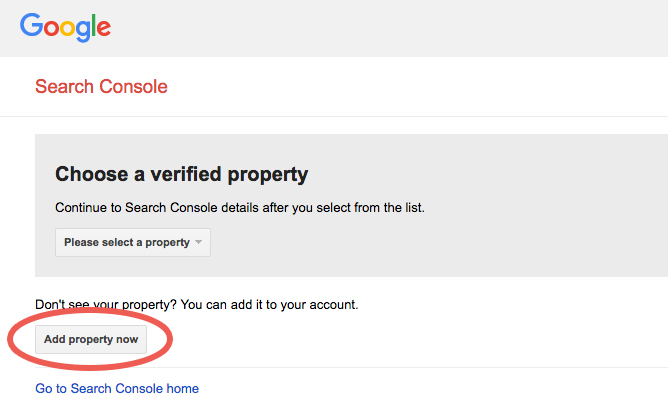
- Head to your Google Webmaster Page. Remember that account you created? You’ll need to “Add Property,” which in layman’s terms means “Tell Google what website you own.” Follow the steps to verify that you own the domain. After your domain is added and verified, click on the domain under “Properties.”
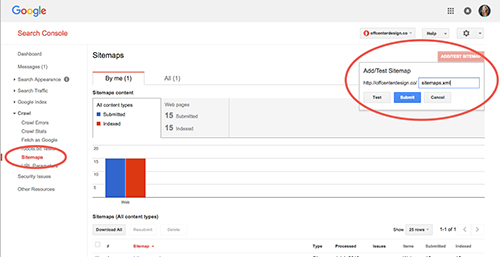
- Once you’re in, on the left-hand side, click the dropdown arrow next to “Crawl,” then choose “Sitemaps.” Click on the big red button on the top right-hand corner that says “Add/Test Sitemap.” If you used my recommended XML Sitemaps, here you’ll enter “sitemap.xml”. (No quotation marks.) You may first want to hit “Test” to make sure there are no syntax errors. If there are no errors, enter “sitemaps.xml” again, but this time hit “Submit.” If there are errors, you may want to call a professional web builder, like yours truly. 😉
- Okay, that takes care of Google, but what about Bing? Yep, more footwork. But I promise it’ll be worth it! You pretty much have to follow the same steps. Go to Bing Webmaster Tools. If you don’t have an account, you’ll have to create one. If you do have an account, login. If you’re not directed here, this is where you want to be after you’re logged in. Enter your site URL into the top box, and click “Add.” Follow the steps to verify your domain. Enter the URL for your sitemap: it’s exactly the same as above (www.yourdomain.com/sitemaps.xml), and since you’ve already uploaded this XML file to the root folder of your website server through FileZilla or Cyberduck, you don’t need to do this again! Hit “Submit.”
BOOM. That’s it! Next, you wait patiently for the search engines to receive your map and crawl your site.
But don’t just sit there! In the meantime, start boosting your website’s traffic by:
- Publishing/posting good, useful, and authentic content.
- Talk about your website on social media platforms. Give people a reason to visit your site!
- Guest post on related websites’ blogs, and put a link to your website there!
- Call your local graphic designer, and get some sweet graphics to go along with your branding!

 I know you’re tired of being the world’s best-kept secret. Shoot, you’re just tired in general.
 When your website is already kicking butt, the best way to convert browsers into buyers is with a sales funnel.